![]()
The goal of this tutorial is to run Apache Airflow on a single EC2 instance as a Systemd service and execute tasks on other EC2 instances in the cluster by using Airflow’s SSH operator. Running Airflow as a Systemd service requires some configuration, but it has many advantages over manually starting Airflow processes. In case one of the Airflow services fails or the machine unexpectedly reboots, the Airflow services are automatically restarted without any user interference providing more fault tolerance to the pipeline.
To start, we need at least two EC2 instances, one to host Airflow and a MySQL database that serves as the backend and one to test the SSH operator. Ideally, the database is located on a separate server, but for the sake of simplicity we install it on the same instance as Airflow. I will not go into details on how to launch the EC2 instances, since there are already many resources available, e.g. this blog post on how to create a cluster of instances on AWS. The instance type we are using here is a t2.medium for the Airflow instance. This is the smallest instance type recommended for this setup. We are not going to do any work on the second EC2, therefore a t2.micro will be enough. For this article we will call the this second machine webserver. The operating system used in both cases is Ubuntu 18.04.
The first thing we need to do is add a new user for the Airflow processes. All Airflow processes will run under this user. This will be especially useful if more than one developer interacts with the server.
$ sudo useradd airflow
Install MySQL server
In the next part we set up the MySQL server to host the Airflow database. In order to use MySQL as a backend for Airflow we also need the mysqlclient library.
$ sudo apt-get install mysql-server default-libmysqlclient-dev
Once the MySQL server is installed, we can log in and create the necessary user and database. To login as root execute:
$ sudo mysql -u root
Once we are logged in we can create the Airflow database, as shown in the first line below. In the second and third line we create the Airflow user and grant this user access to the Airflow database. In the last line the new Airflow user’s privileges are saved.
mysql> CREATE DATABASE airflow CHARACTER SET utf8 COLLATE utf8_unicode_ci;
mysql> CREATE USER 'airflow'@'localhost' IDENTIFIED BY 'airflow';
mysql> GRANT ALL PRIVILEGES ON airflow.* TO 'airflow'@'localhost';
mysql> FLUSH PRIVILEGES;
Install Airflow
Before we install Airflow, we first need to install all its dependencies. Airflow is written in Python, so we need to install Python 3 from the Ubuntu repositories by executing:
$ sudo apt-get install python3-dev python3-pip
Another Python package that was missing during my installation was typing_extensions. We can install it through pip as:
$ sudo pip3 install typing_extensions
When installing Airflow, you have the option of installing additional packages. For our setup we also want to install the SSH hooks and operators as well as support for MySQL backend. A complete list of extra packages can be found in the Airflow documentation.
$ sudo pip3 install apache-airflow[ssh,mysql]
Prepare Airflow directories
By default, Airflow home will be set to the user’s home directory. We want change this in order for all users to have access to the Airflow directory. We are going to install everything in the system’s /opt directory. This can be achieved by creating the directory /opt/airflow and pointing the environment variable AIRFLOW_HOME to that directory.
$ sudo mkdir /opt/airflow
$ export AIRFLOW_HOME=/opt/airflow
Now we can initiate the Airflow database by executing:
sudo -E airflow initdb
We use the -E flag to preserve the environment variable for the Airflow AIRFLOW_HOME directory we just set. This will initialize the Airflow database in a SQLite database. To change the backend to the MySQL database we edit the Airflow configuration file in /opt/airflow/airflow.cfg and set
sql_alchemy_conn = mysql://airflow:airflow@localhost:3306/airflow
This connection string tells Airflow to use the MySQL database airflow on the current machine with user airflow and password airflow. In order to use MySQL as a backend there is one more configuration that needs to be adjusted according the Airflow documentation. Edit the file /etc/mysql/conf.d/mysql.cnf and add
[mysqld]
explicit_defaults_for_timestamp=1
Now, restart the MySQL server for the changes to take effect by executing:
$ sudo systemctl restart mysql.service
Once the backend is switched to MySQL, the Airflow database needs to be re-initiated to reload the new configuration settings.
$ sudo -E airflow initdb
$ sudo chown airflow:airflow /opt/airflow -R
$ sudo chmod 775 /opt/airflow -R
We are also changing ownership of that directory to Airflow, the new user we created in the beginning. Since all users should be able to access this directory we also adjust the permissions of the directory. This allows users e.g. to create and edit DAGs that are stored here.
Set-up Systemd services
In the following we go over the details on how to run Airflow as a Systemd service. The Airflow Github repository provides template files that can be used to setup the services. We can download and save these files in a temporary directory.
$ wget https://raw.githubusercontent.com/apache/airflow/master/scripts/systemd/airflow
$ wget https://raw.githubusercontent.com/apache/airflow/master/scripts/systemd/airflow.conf
$ wget https://raw.githubusercontent.com/apache/airflow/master/scripts/systemd/airflow-webserver.service
$ wget https://raw.githubusercontent.com/apache/airflow/master/scripts/systemd/airflow-scheduler.service
There are other *.service files in the Github repository which we will not be using here. Before we adjust the files we need to make sure that we know the correct path to the Airflow binaries. Check the path by typing:
$ which airflow
/usr/local/bin/airflow
For most users Airflow will be installed in the default location in /usr/local/bin. Now we can adjust the configuration files one by one. We start with the file called airflow. This file sets up the environment for Airflow such as the AIRFLOW_HOME path. Add the following lines to the end of the file.
AIRFLOW_CONFIG=/opt/airflow/airflow.cfg
AIRFLOW_HOME=/opt/airflow
Next, we adjust the *.service files. These files define the Systemd services to be run. In each file, edit the setting ExecStart to point to the correct Airflow path that we found earlier. If Airflow is located in a different place, adjust the path according to the output of which airflow.
ExecStart=/usr/local/bin/airflow webserver --pid /run/airflow/webserver.pid
This line needs to be modified in all *.service files. These are all the adjustments we need. We can now move the files to their proper locations.
$ sudo cp *.service /usr/lib/systemd/system/
$ sudo cp airflow.conf /usr/lib/tmpfiles.d/
$ sudo cp airflow /etc/sysconfig/
If one of these directories does not exist you can create them. In my case I had to create the directory
$ sudo mkdir /etc/sysconfig
before moving the airflow file. Each Systemd service stores the process Id in the /run directory, so that the process can be terminated when necessary. In order for Airflow to work properly we need to create the corresponding folder and give it the necessary permissions.
$ sudo mkdir /run/airflow
$ sudo chown airflow:airflow /run/airflow
$ sudo chmod 755 /run/airflow -R
Now, all the files are in the correct location and we can enable the Airflow services.
$ sudo systemctl enable airflow-scheduler.service
$ sudo systemctl enable airflow-webserver.service
This will enable the scheduler and web-server services and make sure that they start every time the system starts or restart after failure. To start the services execute:
$ sudo systemctl start airflow-scheduler.service
$ sudo systemctl start airflow-webserver.service
The Airflow scheduler and webserver are now running. We can check if the the web service is working by opening the web interface in a browser.
http://<EC2-public-IP>:8080
<EC2-public-IP> is the public IP address of the EC2 instance. Make sure that the AWS security group associated with the EC2 instance allows HTTP connections.
Create a SSH connection
Before we create the SSH connection we need to make sure that Airflow has permission to ssh into the webserver. This can be done by creating a SSH key and storing that key in the authorized_keys file on the webserver. On the Airflow server execute:
$ ssh-keygen -t ed25519
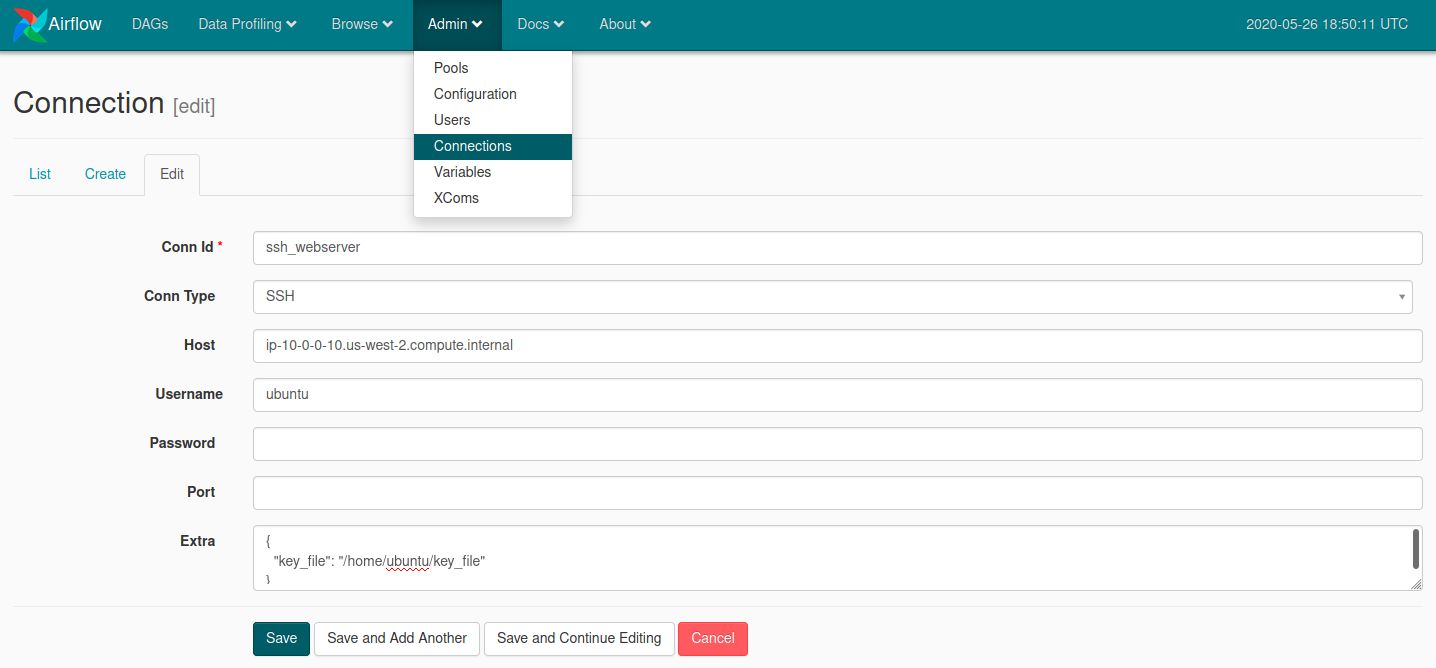
and add the content of ~/.ssh/id_ed25519.pub to the file ~/.ssh/authorized_keys on the webserver. To test our setup we will create a simple DAG using a SSH operator. The DAG will have one task that checks the existence of a file and if not present creates it and writes some text into the file. In order to use the SSH operator we create a new connection in the Airflow web interface. Under Admin -> Connections we create a new connection with Id ssh_webserver. We adjust the connection details such that Airflow can ssh into the webserver. Therefore, the Host field needs to be the internal IP or DNS of the webserver. The username is that of the webserver user. To get the correct user type
$ whoami
ubuntu
We also provide an extra option key_file that points to a file called key_file. This file holds the private SSH key of the Airflow EC2 instance. To create the file we can use the SSH key generated earlier and save the private key to key_file.
$ cat ~/.ssh/id_ed25519 > /home/$USER/key_file
Create the DAG
We create a new DAG /opt/airflow/dags/airflow_ssh_test.py in the default DAG directory set in the Airflow configuration file /opt/airflow/airflow.cfg. The content of airflow_ssh_test.py is:
from airflow import DAG
from airflow.contrib.operators.ssh_operator import SSHOperator
from airflow.utils.dates import days_ago

args = {
    'owner': 'airflow',
    'start_date': days_ago(1),
}

dag = DAG(
    dag_id='airflow_ssh_test',
    default_args=args,
    schedule_interval=None,
)

command='''
FILE=/home/ubuntu/airfile.txt
if [ ! -f "$FILE" ]; then
    echo "Hello from Airflow!" > $FILE
fi
'''

task= SSHOperator(
    task_id='Say_hello',
    ssh_conn_id='ssh_webserver',
    command=command,
    dag=dag)

if __name__ == "__main__":
    dag.cli()
Here I want to point out two arguments of the SSH operator. The first is the ssh_conn_id which is the Id of the connection we created in the previous section. The second is the command argument. This is the ssh command we want to execute on the webserver. In our case it consists of a small script that checks if the file airfile.txt exists and if not creates the file with content “Hello from Airflow!”. This helps us to see if the task completes successfully.
Run the DAG
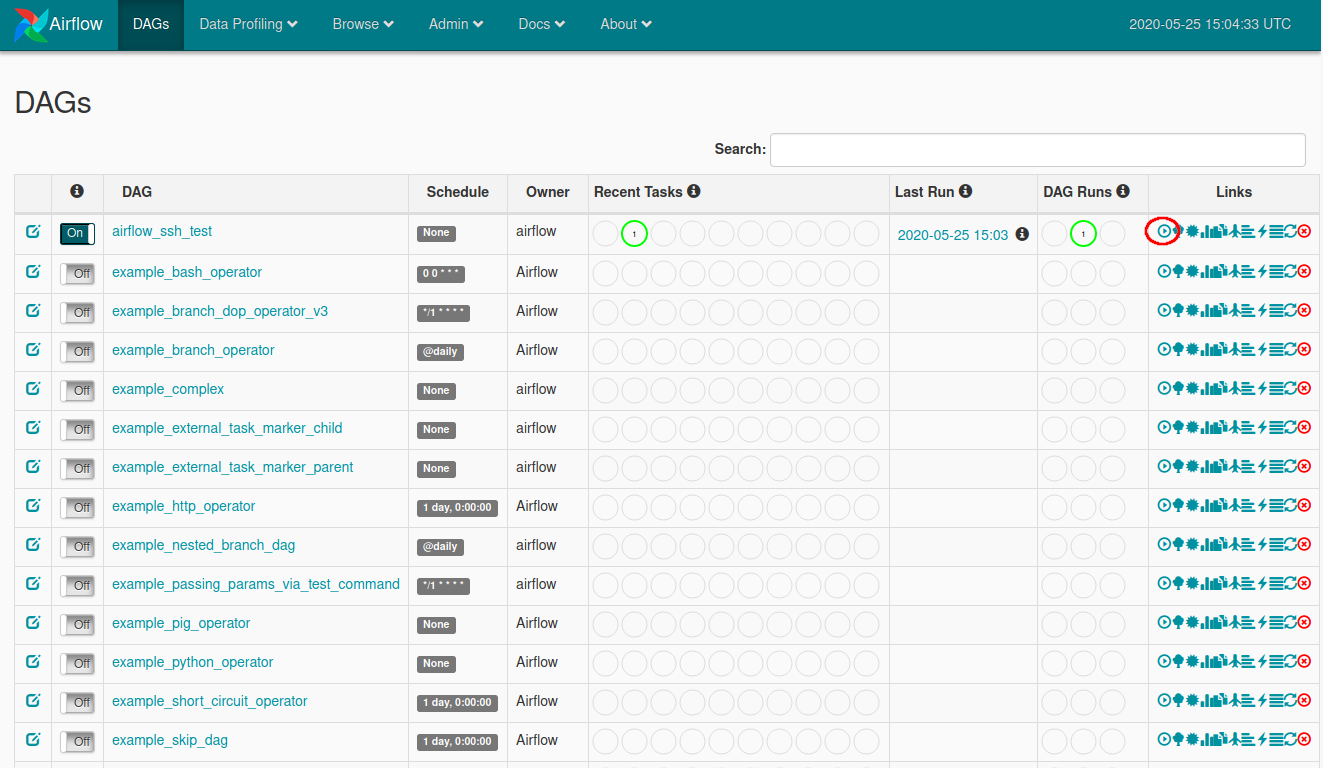
We can trigger the DAG using the Airflow web interface. Switch on the DAG and trigger a run as indicated in the screenshot below. Once triggered, you can follow the status of the DAG in the overview. After the DAG’s task has successfully completed, a dark green circle will appear in the Recent Tasks section on the left side. The light green circle seen in the screenshot indicates the task is running.
Be sure to check the webserver to see if the airfile.txt file was successfully created.
Check the Airflow database
To check if the Airflow settings are correctly stored in the MySQL database we can check if the new SSH connection we created is correctly stored. Log into the database by executing:
$ sudo mysql -u root
Query the Airflow connections table to check for the ssh_webserver entry:
mysql> SELECT id, conn_id, conn_type, host FROM airflow.connection WHERE conn_id = 'ssh_webserver';
+----+---------------+-----------+-----------------------------------------+
| id | conn_id       | conn_type | host                                    |
+----+---------------+-----------+-----------------------------------------+
| 39 | ssh_webserver | ssh       | ip-10-0-0-10.us-west-2.compute.internal |
+----+---------------+-----------+-----------------------------------------+
1 row in set (0.00 sec)
Alternatively, check if the DAG we just ran is correctly logged in the database.
What if I don’t have access to AWS?
Most of this tutorial describes how to set up Airflow and the MySQL database on a single EC2 instance. Following the same steps Airflow can also be installed on a single computer or laptop. However, some of the Systemd configurations might change when using a different Linux flavor. Changing the SSH operator in Airflow to a regular Bash operator allows you to try this on a single machine.
I have successfully installed Airflow on a Raspberry Pi 4 cluster using the same steps, with one small addition. To install NumPy, which is a dependency of Airflow, you need to install libatlas-base-dev first, as mentioned here.
$ sudo apt-get install libatlas-base-dev